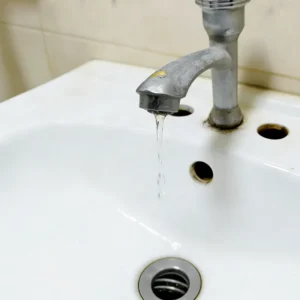
A dripping faucet is often underestimated. What starts as an occasional drop can quickly turn into a persistent issue that wastes water, increases operational costs, and signals internal wear. In many cases, the leak is not the problem itself—but a symptom of component fatigue or system imbalance.
Taking a closer look at the causes allows for more effective maintenance and longer service life.
Even a slow leak can have measurable consequences over time. A single faucet may waste thousands of gallons annually, while prolonged exposure to moisture can gradually affect surrounding materials.
Common impacts include:
Addressing the issue early helps maintain both efficiency and system integrity.
Most faucet leaks can be traced back to a few key factors:
Washer Wear
Continuous friction causes washers to lose shape, leading to dripping at the spout.
O-Ring Deterioration
O-rings maintain internal seals. When they degrade, leaks often appear near the base or handle.
Cartridge Failure
Damaged cartridges disrupt internal sealing and water regulation.
Loose Internal Components
Connections such as packing nuts may loosen with repeated use.
Mineral Deposits
Sediment buildup interferes with proper sealing, especially in areas with hard water.
Water Pressure Issues
Excessive or fluctuating pressure can strain otherwise functional components.
Valve Seat Corrosion
Over time, corrosion at connection points reduces sealing efficiency.
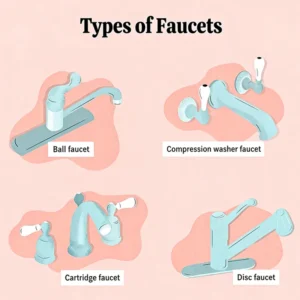
Faucet structure plays a key role in both performance and failure points. The four most common types include:
Ball Faucets
More complex in structure, commonly used in kitchens and prone to multiple component wear points.
Compression Faucets
These rely on rubber washers to seal water flow. Frequent use leads to gradual wear.
Cartridge Faucets
Designed for smoother operation, these use internal cartridges that may degrade over time.
Ceramic Disk Faucets
Highly durable, though still susceptible to mineral buildup in hard water conditions.
Identifying the faucet type helps streamline troubleshooting and repair.
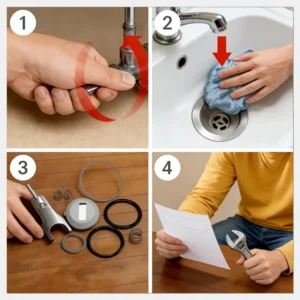
Step 1: Shut Off the Water Supply
Before starting any repair, turn off the water supply to avoid flooding or unnecessary mess. Locate the shutoff valves under the sink and turn them clockwise until fully closed. Then turn on the faucet to confirm that the water has stopped completely. If you are working on a bathtub or shower faucet, you may need to shut off the main water supply for the house.
Step 2: Plug the Drain
Plug the sink drain using a stopper or a cloth. This prevents small components such as screws, washers, or clips from accidentally falling into the drain, which can make the repair much more difficult.
Step 3: Disassemble the Faucet
Carefully remove the faucet handle and any decorative caps. In many cases, screws are hidden underneath these caps. As you disassemble the faucet, keep all parts organized in order or take photos to help with reassembly later.
Step 4: Prepare Replacement Parts
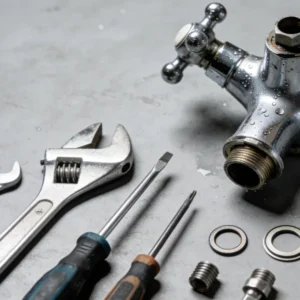
Before proceeding, make sure you have the correct replacement parts. If you know the faucet model, purchasing a repair kit is the easiest option. Otherwise, take the worn parts to a hardware store and match them precisely in size and shape.
Once the faucet is open, identify its type. Different faucet designs require different repair methods, so it is important to follow the correct instructions for your specific type.
Step 1: Remove the Handle
Start by removing the handle to expose the cap and adjusting ring. This will give you access to the internal components of the faucet.
Step 2: Adjust the Ring if the Handle Leaks
If water is leaking from around the handle, you may be able to fix the issue by slightly tightening the adjusting ring. Turn it gently clockwise and test the faucet. Be careful not to overtighten, as this can make the handle difficult to operate.
Step 3: Disassemble the Faucet
If the leak continues, remove the cap, collar, and spout to access the internal mechanism. Carefully take out each component and note their positions.
Step 4: Inspect the Ball
Examine the ball for signs of wear such as corrosion, cracks, or pitting. If it is damaged, it should be replaced. Minor mineral buildup can often be cleaned using white vinegar. If the ball is significantly worn or damaged, repairs can be difficult and unreliable, so replacing the entire faucet is often recommended.
Step 5: Check Valve Seats and Springs
Remove the valve seats and springs carefully, as they may pop out. These parts are common sources of leaks and should be replaced if worn.
Step 6: Inspect and Replace O-rings
Check the O-rings at the base of the faucet body. If they are worn or brittle, replace them and apply plumber’s grease before installing the new ones.
Step 7: Reassemble the Faucet
Reassemble all components in the reverse order, ensuring proper alignment. Test the faucet after turning the water back on.
Step 1: Remove Handle and Spout
Remove the decorative cap, unscrew the handle, and pull it off. If necessary, remove the spout to expose the cartridge.
Step 2: Remove Retaining Components
Look for retaining nuts, clips, or fasteners holding the cartridge in place. Remove them carefully to access the cartridge.
Step 3: Remove the Cartridge
Pull the cartridge straight out, using pliers if needed, while applying gentle force to avoid damaging surrounding components. Once removed, check the cartridge for signs of wear, cracks, or mineral buildup. In many cases, replacing the entire cartridge is the most effective and reliable solution.
Step 4: Replace O-rings
Inspect the O-rings on the cartridge and inside the faucet body. Replace any worn ones and apply plumber’s grease before installation.
Step 5: Reinstall the Cartridge
Install the cartridge in the correct orientation, aligning any tabs or notches. Incorrect alignment may reverse hot and cold water flow.
Step 6: Reassemble the Faucet
Reassemble all parts and test the faucet to ensure the leak has been resolved.
Step 1: Remove Handle and Escutcheon
Unscrew and remove the handle, then take off the decorative escutcheon to expose the cylinder assembly.
Step 2: Remove the Cylinder
Unscrew the mounting screws and lift out the cylinder assembly. Note its orientation for correct reinstallation.
Step 3: Inspect Seals and O-rings
Check all seals and O-rings for wear or damage. Replace any faulty components.
Step 4: Clean Mineral Buildup
Use distilled white vinegar to clean any mineral deposits inside the cylinder. Gently scrub with a non-abrasive pad if necessary.
Step 5: Replace Components if Needed
If the ceramic disk or cylinder is damaged, replace the entire assembly with a matching part.
Step 6: Reassemble the Faucet
Reassemble all components carefully, ensuring proper alignment and secure connections.
Step 7: Restore Water Slowly
Turn the water supply back on gradually to avoid damaging the ceramic disk with sudden pressure.
Step 1: Remove the Handle
Unscrew and remove the handle to access the valve stem.
Step 2: Remove the Valve Stem
Use a wrench to unscrew and pull out the valve stem assembly from the faucet body.
Step 3: Replace the Washer
Remove the old rubber washer at the bottom of the stem and replace it with a new one of the same size.
Step 4: Inspect the Valve Seat
Check the valve seat for buildup or damage. Clean or replace it if necessary.
Step 5: Reassemble the Faucet
Reassemble all parts and test the faucet after restoring the water supply.
Step 1: Turn Water Back On
Slowly turn the water supply back on to avoid sudden pressure.
Step 2: Check for Leaks
Observe the faucet closely and check for leaks around the handle, spout, and base.
Step 3: Make Adjustments if Needed
If leaks persist, ensure all parts are properly aligned and securely tightened, or consider replacing worn components again.
Beyond the visible drip, the long-term effects can be more significant:
These factors make timely maintenance a practical necessity rather than an optional fix.
In more complex cases, professional assistance is advisable:
In many cases, recurring leaks are not simply the result of poor maintenance—they often reflect the overall quality of the faucet itself. Factors such as precision engineering, material durability, and sealing performance all play a critical role in determining how well a faucet performs over time.
For distributors, contractors, and project buyers, selecting high-quality faucets and components can make a substantial difference in long-term reliability. Well-manufactured products are designed to maintain consistent sealing, resist corrosion, and withstand daily wear. Sourcing dependable solutions from the outset not only minimizes the risk of leaks but also reduces maintenance frequency and overall lifecycle costs.
This usually indicates internal wear, such as a damaged washer, cartridge, or valve seat. Tightening the handle further will not solve the underlying issue and may accelerate damage.
The cause often depends on the faucet type and leak location. Drips from the spout typically point to washers or cartridges, while leaks at the base often involve O-rings.
Lifespan varies depending on usage and water quality, but high-quality components can last several years with proper maintenance.
Worn washers and O-rings are among the most frequent causes, especially in older or frequently used fixtures.